Installing drawer slides is nothing for those who are into woodworking. But for regular people, it can be quite of a task that needs some research and guidelines.
So, if you are hunting for an easy-to-follow guide on how to install drawer slides on face frame cabinets, then you’ve entered the very right place.
Today let’s talk about the entire process and make it as simple as possible. Keep on Reading…
Installing Drawer Slides on Face Frame Cabinets Can Be A Bit Difficult!
The first thing that makes this whole process a bit intimidating is the 3D alignment. The drawer and slide need precise adjustments for making alignment of both sides. And beginners may fall short in this area.
Another problem that basically exists due to the face frame cabinet is finding a suitable spot for screwing. Not to mention the difficulty with ending adjustment of the drawer that is a must need to get a smooth operation.
Also, you’ll need to work for different drawer differently. As not all of them are the same and each would require a certain type of adjustment. Another common issue is noticeable with those who don’t have proper jigs. And that sums up some of the terrible difficulties usually noticeable with beginners which can end up making them give up too soon.
So, when you are about to learn the proper installation process, make sure you’re aware of solutions to all of these issues, and then go ahead with trying it.
Start with Preparing the Cabinet
You need to do ensure a few things before installing the slide. First of all, ignore 3 feet wider drawers. These are way too large and will end up being saggy and wobbly. Also, the drawer interior should be a perfect square, not any other shape. In case you want to install inside the drawer make sure to watch out for cupping areas on sides that can cause pinching.
Furring out the cabinet inside is necessary for face frame cabinets. You should locate the furring strips right where the slides will go.
Cabinet Member Installation
The center of the drawer slides must be on a certain line that you will draw at this point. Start by making a mark on the center of where you would like to install it. Then using a level, draw a line.
This needs to go from your made mark towards inside of the drawer. Create two lines on both sides of the cabinet. Then you want to install cabinet members ensuring screws are on the center of line. For adjustment needs, you can go for screws inside the U shape tab.
In case of inset drawer faces, hold slides maintaining distance from drawer face of the front. However, the slides need slightly back installation from cabinet front in case of overlay drawer faces. Getting long slides for the drawer will help you have an additional wiggle room in the cabinet.
Drawer Member Installation
The next part to install side mount drawer slides on face frame cabinet involves some cutting. You need to cut the sides of a drawer to match slides’ length. Placing the slide onto sideboard of drawer, mark right onto the center where you’d want it to install.
Do this for both sides. Then create level lines that are parallel with the top edge. Screw the drawer members on sides keeping them in line. Then insert into cabinet members and ensure that sides are sliding well.
You want to take measurements in front and back of the sides. Then following the smaller of two measurements, cut front and back of drawer. Going for the smaller side is better here.
Making Adjustments as Needed
Attach the back and front to sides of the drawer. Use pocket holes or nails and glue. You can even try self-tapping screws. Attach bottom to sides, front, and back of drawer. It needs to be square while attaching the drawer. Insert it into the cabinet and make sure it is sliding right.
If the sliding isn’t as you’d expect it to be, there are some slight adjustments you’ll need to make. Understanding how to install full extension drawer slides on face frame cabinets through the right adjustment is crucial here. You keep on adjusting as long as the drawer seems smaller than opening. You can also cut the drawer down to make it right size.
Bending the tabs outwards can also help to get some space between cabinet and drawer slide. Checking how the drawer bottom is lining with slides can also help. You also need to find out the area that seems not square with cabinets.
Shim drawer slides through bending tabs and keep on adjusting until it’s perfect. In the case of a vertically binding drawer, you can loosen the drawer members’ screws for adjusting box a bit up and down. So that the drawer glides correctly.
Things to Keep in Mind
The perfect alignment of the drawer slide needs pre-planning. Make sure you give at least 30 minutes on planning for the whole process before actually trying it.
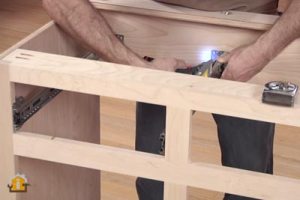
The lack of enough light can make this process unnecessarily time-consuming. Having a cordless light can solve the problem just like that.
The screws getting lost in between the process is a nightmare. Having them all in one place or using a magnetized bit holder can keep those risks away.
While it’s possible to install slides after cabinet installation is done, it’s better to go the other way. You have more flexibility to fix drawer slides when the cabinet is still uninstalled.
Losing track of which drawer goes where can be easily solved with marking. You can use a regular pencil or marker or even tape pieces to keep things marked and confusion-free.
When trying to install drawer slides on face frame cabinets with mounts, go for rear bracket types.
Wrap Up
Now you know how to install drawer slides on face frame cabinets. Checking some of the best soft close drawer slides for cabinet can be your next thing to research.
Also, don’t forget to check the instructions provided by manufacturer. Especially when you need to be aware of its maximum weight information. As then there will be a must need for heavy duty drawer slides. One fine example could be liberty drawer slides.
This is Adam Sullivan, the author of tchardwaretools.com! I started my days as a mobile carpenter to become a full-time shop owner, and have been living my professional life for more than 8 years now.
Here I want to share my thoughts, experiences, and ideas through this platform. Stay Tuned!